
Trucks are the workhorses of the automotive world, built to handle heavy loads and tough conditions. They come equipped with robust components, including power windows, to ensure functionality and convenience. However, just like any other vehicle, trucks may encounter issues with their window motors over time. In this article, we’ll explore the significance of window motor replacement for trucks and guide you through the process of keeping these heavy-duty windows powered.
The Role of Power Windows in Trucks
Power windows have become a standard feature in modern trucks, offering a range of benefits that cater to both driver comfort and functionality:
- Convenience: Power windows make it effortless to open and close windows with the push of a button. This convenience is especially valuable for truck drivers who may need to adjust windows frequently during their journeys.
- Safety: Quick and easy access to window controls is crucial for ensuring driver safety. Power windows allow for rapid adjustments, ensuring that drivers can maintain focus on the road while adjusting their windows.
- Security: Power windows often come with centralized controls that allow the driver to lock all windows simultaneously, enhancing the security of the vehicle.
- Aesthetic Appeal: In addition to their functionality, power windows contribute to the overall aesthetics of modern trucks, offering a sleek and integrated appearance.
Signs of a Faulty Window Motor in Trucks
Over time, the window motor in trucks may wear out or develop issues that necessitate replacement. Recognizing the signs of a faulty window motor is essential for addressing the problem promptly. Here are some common indicators:
- Sluggish Operation: If your truck’s power windows start to move slowly or with hesitation, it may be a sign of a weakening window motor.
- Unusual Noises: Grinding, clicking, or screeching sounds when operating the windows can indicate motor problems.
- Inconsistent Movement: When the window’s movement becomes irregular or jumpy, it suggests that the motor is struggling.
- Complete Failure: Of course, the most apparent sign of a faulty window motor is when the window doesn’t move at all.
The Importance of Window Motor Replacement for Trucks
Addressing a faulty window motor in a truck is more than just a matter of convenience; it’s crucial for several reasons:
- Operational Efficiency: Trucks are often used for work purposes, and operational efficiency is vital. Malfunctioning power windows can slow down processes, hinder communication with others outside the vehicle, and disrupt daily operations.
- Safety: Trucks, especially those used for commercial purposes, require quick and reliable access to windows. In emergency situations, a functional window can be a lifeline for the driver or passengers.
- Comfort and Climate Control: Trucks frequently cover long distances, and comfortable cabin conditions are essential. Functional power windows allow for efficient climate control and airflow management.
- Security: Trucks often transport valuable cargo or equipment. Functional power windows contribute to the overall security of the vehicle by allowing for swift adjustments and central locking.
The Window Motor Replacement Process for Trucks
Replacing a window motor in a truck is a task that requires some mechanical expertise and the right tools. Here’s a step-by-step guide to help you through the process:
Step 1: Gather Your Tools and Materials
Before you begin, ensure that you have all the necessary tools and materials ready:
- Screwdrivers (both flathead and Phillips)
- Pliers
- Socket set
- Trim panel removal tools
- New window motor (ensure it’s compatible with your truck)
- Safety glasses
- Gloves
- Work gloves
- Ratchet and extension
Step 2: Disconnect the Battery
Safety should always be a top priority when working on any automotive project. Begin by disconnecting the negative terminal of your truck’s battery to prevent any electrical accidents.
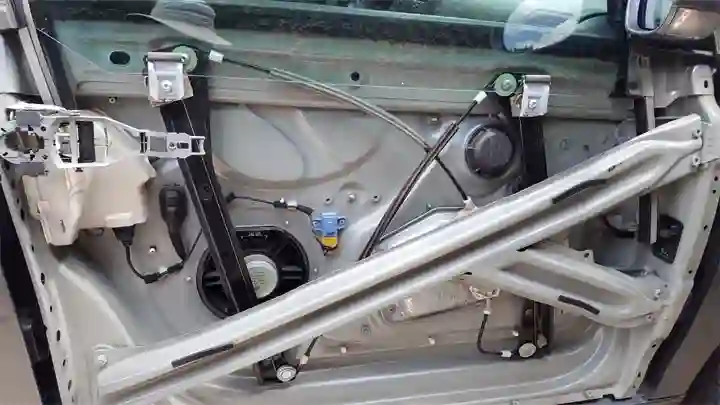
Step 3: Remove the Door Panel
The window motor is typically located inside the door panel, so your next step is to remove it. Use your trim panel removal tools to carefully pry off any covers or panels on the door, exposing the screws beneath. Remove these screws using your screwdriver.
Once the screws are removed, gently pry the door panel away from the door frame. Be careful not to damage the panel or any clips holding it in place. Gradually work your way around the panel until it’s entirely detached.
Step 4: Disconnect Wiring and Components
With the door panel removed, you’ll have access to the window motor and its wiring. Locate the electrical connector connected to the motor and disconnect it. Depending on your truck’s make and model, you may need to use pliers to release any retaining clips or tabs.
Additionally, if there are other components like door handles or locks attached to the panel, disconnect them as well to make the panel removal process easier.
Step 5: Remove the Old Motor and Replace
Locate the mounting bolts or screws securing the old window motor to the door frame. Use your socket set to remove these fasteners, and carefully extract the old motor. Replace it with the new one, ensuring it’s correctly aligned with the mounting holes.
Step 6: Reassemble the Components
With the new motor installed, it’s time to put everything back together. Follow these steps in reverse order:
- Reattach the window regulator to the door frame, securing it with the bolts or screws.
- Reconnect any electrical connectors and components you disconnected earlier.
- Carefully position the door panel back onto the door frame, ensuring that all clips and screws align correctly.
- Reinsert and tighten the screws you removed from the door panel, making sure it’s securely attached.
- Finally, reconnect the negative terminal of your truck’s battery.
Step 7: Test the Window
Now that you’ve completed the replacement process, it’s time to test your truck’s window motor. Turn the ignition key to the “On” position and try operating the window. Pay attention to the speed and precision of the window’s movement. If any adjustments are needed to ensure smooth operation, make them with care.
Step 8: Final Checks and Adjustments
Before you conclude the process, double-check that all components are securely fastened, and the window operates correctly. Make any necessary adjustments or corrections to ensure everything is in perfect working order.
In conclusion, trucks are known for their heavy-duty capabilities, and power windows are a crucial component that contributes to their functionality, safety, and convenience. Replacing a faulty window motor in a truck is essential for maintaining operational efficiency and safety, especially when the vehicle is used for work or long-distance travel. By following the steps outlined in this guide and balancing speed and precision, you can ensure that your truck’s power windows continue to power through the demands of heavy-duty use.